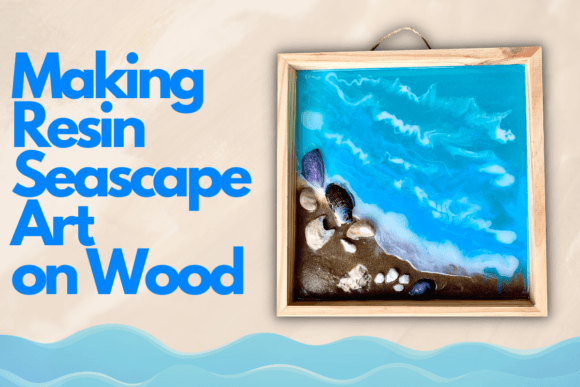
Making Resin Seascape Art on Wood
There’s something magical about the way resin captures color and texture, transforming a simple piece of wood into a stunning seascape. For many, though, working with resin can feel intimidating—like stepping into a lab rather than an art studio. But when you understand the basics and take the right precautions, it becomes a rewarding and accessible creative process. Gatika, a popular resin artist and teacher, has designed one of her most-loved classes to help beginners and seasoned crafters alike discover how to make resin seascape art on wood safely and effortlessly.
What Is Resin Seascape Art on Wood?
Making resin seascape art on wood involves pouring epoxy resin onto a wooden surface and manipulating it with pigments, dyes, or acrylic paints to create the illusion of ocean waves, beaches, and coastal scenes. The resin acts as a clear, glass-like layer that holds everything in place, giving your artwork depth and durability. Unlike traditional painting methods, this technique allows you to build dimension and even embed small decorative elements like shells, sand, or sea glass for added realism.
Why Choose Wood as Your Canvas?
Wood is a natural and versatile material that adds warmth and character to any resin seascape. It’s not just about aesthetics—wood also provides a sturdy base that can be sanded, stained, or sealed before adding resin. This makes it ideal for both wall art and functional pieces like cutting boards or serving trays. Plus, the grain patterns in wood often enhance the visual interest of the final piece, especially when paired with translucent layers of resin.
Choosing the Right Resin
Gatika starts by discussing the type of resin she prefers for seascapes. She recommends using epoxy resin over polyester resins because it offers better clarity and a smoother finish. Epoxy resin cures to a hard, glossy surface that mimics the look of glass, making it perfect for creating realistic water effects. Some brands she favors are known for their low odor, fast curing times, and compatibility with various additives, which is essential when experimenting with colors and textures.
Before beginning, it’s important to choose a resin that suits your project needs. If you’re planning to make multiple coats or include fine details, look for a resin with a longer working time. Always check the manufacturer’s instructions for recommended ratios and mixing times to avoid bubbles or cloudy results.
Mixing Resin: The Foundation of Success
One of the most critical steps in Making Resin Seascape Art on Wood is properly mixing the resin. Gatika emphasizes the importance of accuracy and patience here. She uses digital scales to measure each part of the resin and hardener precisely, ensuring a strong and bubble-free cure. Once mixed, she gently stirs the resin for several minutes, avoiding aggressive movements that could introduce air bubbles.
To prevent bubbles from forming in the first place, some artists use heat guns or torches to pop them after pouring. Others rely on degassing tools or let the mixture sit for a few minutes before application. Gatika shares tips on all these methods, but she particularly likes using a heat gun for its simplicity and effectiveness. Just a few passes along the surface can eliminate most bubbles without requiring specialized equipment.
Coloring Resin with Acrylic Paint
Now comes the fun part—adding color. When making a seascape, the palette usually includes shades of blue, green, and white to mimic the ocean and sky. Gatika uses acrylic paint because it blends easily into resin and doesn’t cause separation or cloudiness. She suggests starting with a base layer of diluted paint mixed into the resin, then building up with additional colors and effects as needed.
A common mistake newbies make is using too much pigment at once. This can change the chemical balance of the resin and affect how it cures. Instead, Gatika recommends using a 1% to 3% ratio of paint to resin. That means for every 100 grams of resin, you should add between 1 and 3 grams of acrylic paint. Start with less and gradually increase if you want a bolder effect.
Creating Realistic Waves
Waves are what bring the seascape to life. Gatika demonstrates two techniques for creating wave effects—one where she drizzles colored resin across the surface, and another where she uses a toothpick or skewer to manipulate the flow manually. Both methods work well depending on the desired outcome. Drizzling gives a softer, more organic look, while hand-pulling allows for greater control and definition.
She also talks about using resin tints or alcohol inks for subtle gradients that resemble sunlight reflecting off the water. These tools are great for advanced users who want to experiment beyond basic acrylics. However, for beginners, sticking with acrylics is perfectly fine—it’s affordable, easy to find, and forgiving when learning the ropes.
Real-World Applications of Resin Seascape Art on Wood
- Home Decor: A resin seascape on wood makes a beautiful statement piece for living rooms, bedrooms, or offices. Its calming effect can turn any space into a coastal retreat.
- Gifts and Keepsakes: Customized seascapes are a hit among friends and family, especially those who love the beach or have a special memory tied to the ocean.
- Commercial Products: Artists and entrepreneurs can sell these as unique home decor items, coasters, or even personalized pet tags (by embedding paw prints in the resin).
- Wedding Decor: Couples looking for a rustic yet modern wedding theme might enjoy incorporating resin seascapes into table centerpieces or signage.
- Interior Design Projects: Interior designers can use these artworks to complement spaces with nautical themes, such as bathrooms or kitchens near waterfront properties.
Adding Decorations: Enhancing the Scene
Once the base colors and wave patterns are set, it’s time to get creative with decorations. Gatika loves to embed things like sand, seashells, driftwood, and even tiny plastic fish into her seascapes. These elements are placed strategically during the second coat of resin, allowing them to sink slightly and become part of the scene.
For example, she might sprinkle fine sand across the surface to represent a sandy shore or glue down a cluster of shells to mimic a tidal pool. These additions don’t just look nice—they help tell a story. Each seascape can reflect a different mood: a calm morning tide, a stormy evening surf, or a tropical lagoon under the sun.
Optional Second Coat and More Layers
If you want to add more depth or complexity to your seascape, Gatika shows how to apply a second coat of resin. This step is optional but highly recommended for achieving professional-looking results. The second coat can be used to reinforce the wave structure, add new color gradients, or embed additional elements.
When applying a second coat, it’s important to wait until the first layer is fully cured—usually 24 hours or more, depending on the resin brand. You’ll also need to lightly sand the first layer to ensure proper adhesion. This is where preparation really pays off. By taking the time to plan your layers and know your materials, you’ll avoid issues like cracking or peeling later on.
Common Considerations Before Starting
Before diving into Making Resin Seascape Art on Wood, there are a few key considerations to keep in mind. First, always work in a well-ventilated area. While many resins today are low-odor, it’s still wise to protect yourself with gloves, goggles, and a mask, especially when mixing large quantities.
Second, think about the size and shape of your wood. Smaller, irregularly shaped pieces can add charm, but they may require extra sealing or support. Larger panels give you more room to play with waves and details, but they also demand more resin and careful handling during the pour.
Third, consider your intended use. If the piece will hang on a wall, you don’t need to worry about weight. But if you're making a cutting board or tray, choose a resin formulation suitable for food contact and seal all edges thoroughly.
Strengths and Limitations of Resin Seascapes
Resin seascape art has many strengths. It’s durable, long-lasting, and can be customized to fit almost any style. The ability to layer colors and embed objects gives it a level of creativity that other mediums struggle to match. Additionally, the finished product is relatively maintenance-free—just a quick wipe with a soft cloth is usually enough to keep it looking fresh.
However, there are limitations. Working with resin requires attention to detail and a bit of practice to master. Mistakes like uneven coatings or trapped bubbles can ruin an otherwise beautiful piece. Also, resin is not eco-friendly, so it's important to dispose of excess materials responsibly and consider using it only for indoor projects unless you opt for UV-resistant formulas.
Practical Tips for Beginners
If you’re new to resin art, here are a few practical tips from Gatika’s class to help you succeed:
- Start with a small project—like a 6x6 inch panel—to get comfortable with the process before moving to larger pieces.
- Use a disposable palette or paper plate for mixing colors and testing effects before applying them to your wood.
- Keep a heat gun or torch handy to remove bubbles quickly and efficiently.
- Don’t rush the curing process. Patience is key to achieving a smooth, glass-like finish.
- Experiment with different types of wood—pine, cedar, and walnut all offer unique textures and tones that can enhance your design.
Tools and Materials You'll Need
- Epoxy resin kit (with hardener)
- Digital scale for accurate measurements
- Acrylic paints (especially blues, greens, and whites)
- Paintbrushes or squeeze bottles for color application
- Sandpaper (fine grit for smoothing surfaces)
- Heat gun or torch
- Wood panel or slab (prepped and sealed)
- Decorative elements (sand, shells, etc.)
- Masking tape or painter’s tape for clean edges
- Protective gear (gloves, goggles, mask)
Who Can Benefit from Making Resin Seascape Art on Wood?
This form of art isn’t just for hobbyists. Teachers can use it to inspire students with hands-on STEM or art lessons. Interior decorators can incorporate custom seascapes into client projects for a personal touch. Entrepreneurs can develop a niche product line for boutique stores or online marketplaces. And for anyone who simply enjoys creating, it’s a relaxing and fulfilling way to spend time, especially when the goal is to recreate the soothing essence of the ocean.
Parents might find it useful for involving kids in weekend crafts, while couples might try it as a collaborative project. Even mental health advocates are exploring resin art as a form of creative therapy, noting how the repetitive, mindful nature of the work can reduce stress and encourage focus.
Final Thoughts
Making Resin Seascape Art on Wood is a blend of science and art that rewards careful planning and creativity. With the right tools and a bit of guidance, you can transform raw materials into something truly beautiful. Gatika’s approachable teaching style helps demystify the process, showing that even those who think resin is “too complicated” can create stunning works with just a little practice.
So whether you're looking to decorate your own home, start a side business, or simply explore a new artistic medium, consider giving resin seascape art a try. The ocean’s beauty is within reach—and it looks amazing when captured in resin on wood.